Thursday, August 31, 2017

Visions do become reality

The Shed ( possibly man cave) Part 2


This picture is one that I drew up while thinking about my shed. I had materials scattered and wanted to utilize them all. I ended up moving the double doors and some windows but all in all the way its panning out is pretty sweet. 


We have paper that we use under Hardi-board that not to many people use. You can see the yellow out line from under because its a two part paper. The yellow layer has a knitted hex pattern in it and goes underneath the tar paper layer. This layer is there as a protection in the case water or moisture gets in. It allows drainage of the moisture but it also creates an air gap to allow for ventilation; therefore, reducing the chances of trapped moisture causing damage to anything underneath. You will also notice that I used real plywood not osb on the walls. This is because real plywood doesn't fall apart when it gets wet or swell; whereas, osb will swell and begin to separate if exposed to water  for to long and allowed to freeze and thaw. 

Also in this photo you can see where I began doing the roof. With the roof where you have a roof line butting into a wall you should always have flashing. At the bottom of the wall you should install a diverter flashing. This flashing is used to direct the water away from the wall as it comes down. Most roofers will just cut a step shingle and bend it the problem with that is that they always have that pin hole in the corner that allows water in. We always build our diverters usually out of a bonderized metal and have it soldered so it is one piece with now holes. On my shed I  built them out of copper and soldered them. 

Also you can see where I started installing the cedar on the dormer. 


Here is a closer look at the diverter flashing. also the dutch lap cedar siding going up the rake wall. 


Back to me being a hoarder: In part one I had mentioned that I had left over Hardi panel from a job. this includes the panel but also included a ton of Hardi shingles. I finally am going to use it all up. I have carried this stuff house to house for a while now. I didn't have any batons so I had to buy those. 
When installing Hardi-board we always use stainless nails in a coil nail. For the trim we use stainless finish nails. I also used the stainless finish nails on the shingles. Sometimes the bigger coil nail will shatter the shingles. 


Another flashing that is commonly missed is a head flashing. Every time you have something below that sticks out further than something above, it needs a flashing in order to allow moisture to shed off and not get trapped. You can see the copper head flashing I put in here. It is 6" in back ,comes away from the wall the distance of the material on a 105 degree angle, comes down 1" and has a hem and a kick. Many Hardi contractors will use a simple L flashing but the point of  the hem and kick is it protects you against and wind driven rain. The kick also lets the water drip away from the window or door rather run down  and risk trapping water.

Also just for detail I added some cedar corbels to each gabel end. 


After getting the trim and batons on I had to decide on color. however I did already draw it white so I painted it white. I tapped off the windows, doors and flashing's; then sprayed away. I always paint my shingles a contrasting color. I think it helps it pop more. 


I decided on a darker gray. I love the contrast. I originally painted the trim around the shingles white, but I got gray on one of them and decided I like it better this way. I still have some touch up to do on the paint. 

Still left to finish is:

Soffit and Fascia
A couple pieces of trim
Ridge cap on the shingles
I need to stain all the cedar the same color.
Some garden boxes
A ramp to make it easier to get the mower in and out
Flagstone around the garden boxes.

At some point I am going to run power out here. Then I will put some carriage lights on either side of the door and maybe some type of light on the side for the garden. Its nice to have power in the shed too. You never now when you will need a man cave. 

Look for Part three of the shed series where hopefully we are all done with this project

Also if you like what you see like and share or subscribe.

You can also find me :


Tuesday, August 29, 2017

Making more room in the garage ? Or more places to put stuff.

The Beginning of The Shed


It is quite possible I am a hoarder. As long as Krissy's car can fit in the garage then the rest of the space is mine right? Wrong! It turns out the whats mine is mine and whats yours is mine rule still applies. I have a mess to clean up. With the work that I do, I often take apart many homes and am told to just throw things away. I have a hard time throwing away stuff that I find may be useful. With that I will show you how I built a $10,000 shed for a fraction of the cost. On this house that we were chasing dry rot and redoing decks, windows, doors and cedar siding; we removed about 2200 sqft of redwood. This redwood came home with me. Along with some cedar beams and other random wood. 


 I checked with the county before I began to make sure I stayed with in the limit of square footage to insure that I didn't need a permit. That Square footage is 200 sqft. I went 12x16 on my shed which equals 198 sqft.  I then checked with all zoning laws for my area to make sure the shed was in compliance. 3' from each lot line.After confirmation I Ran some string lines, set level lines, and found  square. I then set all my foundation blocks. the lot has a slight slope so you can see where my depths change on the blocks. 


I took the redwood and cut them to length. I framed the entire floor out of the redwood. Since it is so close to the ground and it was free. What better wood to use than one that is used commonly in the weather. 


With it all level and set I then Had to purchase some 3/4 Tongue and groove plywood. (no pic) I'm lame I  know.  I sheeted the entire floor. Snapped lines for the walls and started framing the walls. I had decided to build rake walls. instead of building trusses. I didn't have any studs so that was the next thing I had to buy. I built a beam pocket into each rake wall to support my salvaged beam. This beam came off another project where we had replaced a bunch of cedar beams and it had a curve cut into the bottom. If you look close you can see it.


I framed the roof on a 8/12 pitch with 2 x 6's I had lying around at two foot on center. I had originally drawn a dormer and liked the look so I built another rake wall just short enough to give me the required 2/12 slope as required by code for shingles. 


I salvaged some windows and doors from that same project I mentioned before. This is where the big savings came from. The french doors that I used need some adjustment and had some weathering. I t also needed a new support under the threshold. With some work I was able to recondition them. The replacement we bought for the house was $5500. Jeld-wen aluminum clad high efficiency doors. The windows were another $2000.  If the doors look familiar I had quite a few sets. I took the fixed panel of some of those and made a barn door Click Here for my bathroom.


I have left over Hardi panel and shingles from another project. Coming up next I will install the Hardi and get it roofed. I will be doing all copper flashing (salvaged from a job) and paint.  Stay tuned for part 2 and maybe a part three.


Thanks for stopping by  If you like what I have you can smash the subscribe button and follow me on my social media. 


Thursday, August 24, 2017

Expanding Spaces and Saving Lives.

Lighthouse Basement Bedroom Part 2


I actually finished this back in January. Hailey was itching for her new room. She has thought the she was a teenager since she was 3 so now that she is almost there for real. Separating her from her sisters is definitely a good move, as we try to maintain some peace at home. 

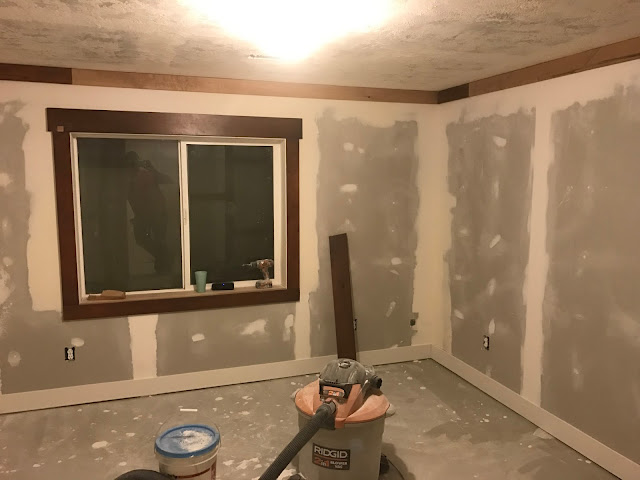
As in a previous post I had all the framing done. I had also insulated the floor and outside walls. I then ran the electrical and the heat register. I was able to hang the sheetrock in a day by myself. I purchased a sheetrock lift and it is the best $200 spent. The first coat of mud and tape was quick but the sanding and other coats took me a while. I coated and sanded every night for a couple weeks. I know I am my own worst critic but I finally got it to the point that I was ok with the finish. 


I had a bunch of reclaimed alder from a project as well as some new pieces I had lying around to use for the trim in her room. I left the door off the closet intentionally cause I have something planned for that. 


I then primed everything. Some would think its a sin to paint the Alder ,but that dark of wood would have darkened the basement way to much. It also just isn't my style at all. 

After primer comes paint. I painted the ceiling in a flat white. All the trim was painted a semi-gloss. Then painted the walls in a Candlestick Gray with a satin sheen. 


I was able to salvage a high quality berber carpet from another project that had some water damage. It is 100% wool. Luckily for me the room it came out of is three times the size of Haileys room. I was able to cut off  a piece with no damage and scrap the rest. With it I also got a really good pad. (Disclosure) I am not a carpet installer. Thank goodness berber is very stiff and forgiving. I put down the pad and tried to stretch carpet. It serves its purpose well. It is temporary when I get the rest of the basement finished I will re-carpet everything professionally.


As I was installing carpet, Hailey and her mom were upstairs taking apart the bunk beds and packing all her stuff. I finished the carpet around 11 at night then ended up setting up her bed and moving all her stuff. Needless to say I have a very happy daughter. 

I still have some things to do but I can do those in the another post. 
I plan on doing custom built in closet cabinets and a door for the closet. Her bed currently clashes with the room and she is lacking some decor. It will happen soon and she will have a room fit for the princess she is. 

More pics to come soon as we get it all styled and finish her closet. 


Wednesday, August 23, 2017

Brookes Nightstand

Brooke's Nightstand


After we painted Brookes room, her nightstand stuck out like crazy in the dark brown. my lovely little wife took it upon herself to strip it and refinish it. She started with Citra strip she applied it in a liberal layer.  It worked really well and previous stain just wiped right off. she then took the same paint that we used on the walls and painted the little nightstand.  We then sprayed it with a clear coat to harden and protect the fresh paint. It turned out really cute and definitely fits better in her room. 


Thursday, August 17, 2017

Adding Curb Appeal

Lighthouse Park Strip


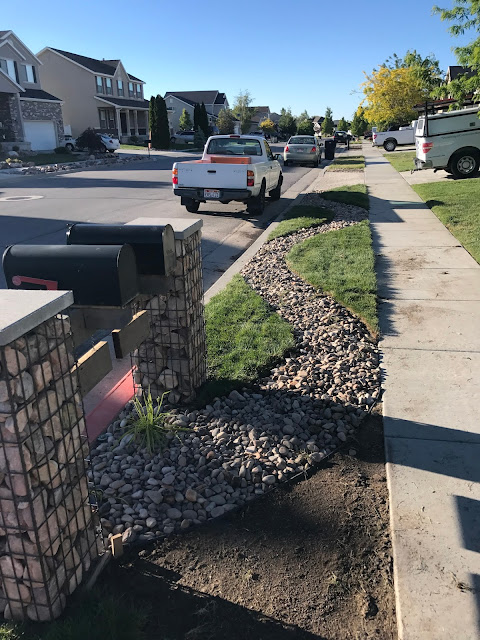
I am not a huge fan of the rocks that our house had when we moved in. I figured I could change it later. It took a couple years but after building the Gabion mailbox (Click here) I  felt there was to much rock going on. I also hate to just get rid of useful material so I redesigned the park strip to incorporate the rocks that I have but give it a cleaner not overpowering look. The problem with a park strip rock garden is that means no one ran sprinklers to the park strip. So the first thing I did was build a water drill. I of coarse can not find the photo so I'll describe it. I went to Depot and grabbed a 24" pvc pipe I then purchased a the straight hose nozzle couple adapters so I could hook it to my garden hose. I dug a hole on the lawn side where I could tie into the sprinklers and then dug a hole on the non sprinkler side. I then turned on the hose and aimed. I will note that I dug a pit below where the hole was being drilled to catch the sediment that was being pushed out to allow for my hole. It only took maybe ten minutes.

I then purchased bendy board for concrete and stakes. I bent the board in the pattern I was looking for and also used the bendy board to corral all the stone into one place. 


After achieving what I thought was a great pattern I then went and found some top soil.  With the work truck full of work stuff and the big Tacoma full of compost: i had to take the little Tacoma. 


It ended up taking three loads of top soil to get the hole thing full. I ended up doing 4-5 inches deep of top soil. I then spent a week watering it down to help it settle. They say to keep it 1" below the sidewalk but I'm a rebel and went like .5 " thinking that when it settled it would be perfect. turns out it may be a little high but it still looks good. I probably did this backwards but i got my shape and added topsoil first. Then i removed my concrete bendy boards and replaced with an edging. This gave me something to cut against with sod but it should prevent the grass from trying to grow into my rocks. 


The benefit of the top soil is  that when I put the sod down the grass grabbed hold and it is super green and its hard to keep up with the mowing. Even in the extreme heat that we have experienced this year it has stayed a  dark green. Other areas in my yard did not fair so well.  I thought I measured well for the sod but I ended up being just a little short. But I have been working on another project in the back yard so I ended up transplanting some grass from there to fill in that last little spot. 


I then added some Mexican Feather Grass that I had been growing in the flower beds. I then divided one of my Stella O'Grady plants and placed them strategically throughout the rocks. 


Tuesday, August 15, 2017

Update Brookes Room

Brookes Room Part 2


Last time we looked at Brookes room it was this light gray color. Mostly because I had a giant bucket of gray paint that we used on the living room. We decided that it needed a little extra so we painted it again. 


As you may remember from another post about painting. I like to blue tape everything and then I take the color I am painting against and paint the edges of the tape. this fills any gaps in the tape and prevents bleeding of the darker color. Anyway we decided to go with a more exciting color that Brooke would enjoy as well. 


I still need to paint her doors. I am in the process of finishing the basement so when I spray the trim and doors for the basement I will repaint all the upstairs doors. 


Drm Properties LLC. delivered straight to your inbox

* indicates required